
Welcome to Techie Tuesday(TT). Out of your Monday Blues..hah.!!??
TT is basically intended to share the TECH knowledge which I learnt (learning too!!) while crafting and blogging. Thanks to Web and especially GOOGLE...my life saver..!! ;)
Today we will see a small tutorial on BASIC Photo Editing in PICASA3 software.
Picasa is a FREEWARE and you can download it HERE if you don't have one :)
Some Questions to Answer before we start :
Why are you doing this Techie Tuesday thing..??
I am just giving back to the web/fellow crafters/bloggers who helped and inspired me a lot.
WHY do I need the above tutorial..??
A crafter's/artist's work is shared mostly through photos. So i believe its very important to do some post processing on the photos before you show them to the world. Pictures do SPEAK a lot for YOU. Am I right..??

Am using a sample picture which I took for one of my projects (Am an amateur by the way..!!)
Here we go....Sample picture straight from the memory card - before editing
 |
| Before Editing |
Open the pic in Picasa Editor.This is how it looks.

STEP(1):
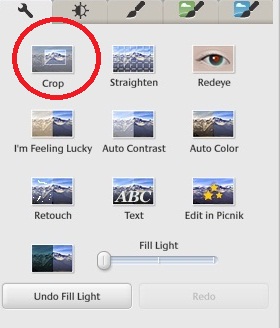 I do cropping as the first thing so as to FOCUS my subject/project and remove any unwanted space around it.
Goto LeftMenu -> 1st tab(Basic Fixes) -> Choose CROP.
I generally choose manual cropping, you many choose default dimensions provided in the drop-down.
By the way you can create your own aspect ratios too..!!
Click 'APPLY' after cropping.
 |
| Manual Cropping of the Image |
STEP (2):

if your picture is too dark.You can slide it up and down to lighten your photo.Am not using on this sample as it is not needed..!!
STEP (3):
Goto Menu -> 1st tab -> Choose AUTO CONTRAST
I always feel that here lies the MAGIC..!!
below is the picture after performing "AUTO CONTRAST "
 |
| After Auto Contrast |
Am a happy girl after this....he hee..totally..!!
 Let us move on to the 2nd tab,the TUNING tab
 Menu -> 2nd tab
As I already mentioned, you may use "Fill Light" slider of this Tab if your picture is too dark and you want to fill some light in it.
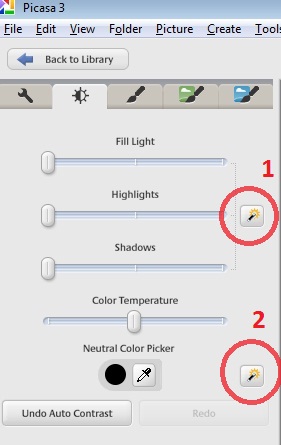
The "Highlights" slider makes the light colors on your image lighter and more obvious. Use it when you want the light parts in your photo to stand out.
(1) button in the picture on your right is -
'ONE CLICK FIX FOR LIGHTING' which on a click adjusts the light setting for your image
(2) button in the picture on your right is -
'ONE CLICK FIX FOR COLOR' which on a click adjusts the color setting for your image
You can UNDO any edit you made on the image.
THANK GOD :)
Step(4):
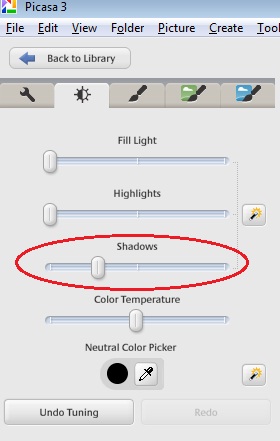 I am using "Shadows" slider. As the name indicates it can be used to highlight shadows of your image.
You can see in the below picture how the shadows have enhanced giving more bolder look to the card.
Just play with the options.Its all trial and error until you get what you need :)
 |
| After Applying Shadows ;) |
Almost Done..!!?? Oh yes.. we will wrap up by a text/watermark to our image.
Step(5):
We will go back to the first tab, the basic fixes tab and choose "TEXT"
Image below shows the color picker. Choose your favorite color.
Font,Size,Style of the text can also be changed.
 |
| Applying Text |
Use "Transparency" slider to give lighter/watermark look for your text.
 |
| After Text with some Transparency |
Below is the final edited image
 |
| Final - Edited Image |
How did you like the tutorial and the Techie-Thursday(TT) Idea..??
Let me know if u have any suggestions/ideas/questions.
You can comment below or drop an email @ sridevimuralikrishna[at]gmail[dot]com.
Please share with your friends/fellow crafters/bloggers if you find the article useful.
Love,
Sridevi MuraliKrishna

Techie-Teusday
About Techie-Teusday:
TechieTeusday(TT) is basically intended to share the TECH knowledge
which I acquired
while craft-blogging. Posts will be on photo-editing, blogging, blogger
features, Gmail and more. As of now, Techie-Thursday posts will be out
on every alternative teusday.
You can see all the Techie-Tuesday posts here.
Thanks Sridevi for TT. I find it very useful as I am new..Not yet tried the watermark for my photos.. Thanks for guiding me..
ReplyDeleteThanks Sindhu..Am happy that you liked it :)
DeleteLovely tutorial!!
ReplyDeleteI have an award for you. Visit my blog and receive it. Do leave a comment.
nice tutorial sri, glad to follow you
ReplyDeleteAdhiraacreations
Healthy recipes
Thank You Shylaashree :)
Delete