
You may feel it as too simple and lazy... but it works..!!
My reply for Why do I need this tutorial question..!!
As seen in the previous "post", the File/Image size dictates the time it takes to load your page.
The larger the size, the longer it will take to load. People like me often don't have the patience to wait, so it would be a better idea to keep your file size less by reducing a bit of its resolution.
Here is where resizing comes to our rescue.
And why MS Paint..??
Oh yes, am talking about Windows7 MS Paint which is packed with lot of cool features.
It does basic, decent and quick photo resizing. And of-course I agree that MS Paint is far behind Photoshop and its equals, but it serves the purpose :)
How To Use Windows 7 Paint Program For Image Resizing
Here, I have chosen a sample image which i took recently for a project.
This pic is "edited in Picasa" to optimize its color and brightness. Watermark added in PhotoShop..!!
In the picture below, you can see the original size of the image before resizing.

Note : Camera I used : Nikon COOLPIX S8100 12.1Mega-pixels
STEP(1):
Right-Click the image you want to resize, then on the context menu Click Open with > Paint.

STEP(2):
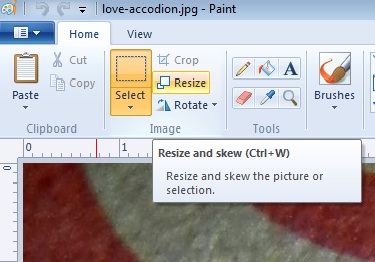 Once the image is opened in Paint, Click the Resize button on the left.
STEP(3):
This should open to the Resize and Skew window. Here you can choose to re-size using percentage or pixels. In the first picture shown below, I used Percentage re-size maintaining aspect ratio.


STEP(4):
Now that the image is the size you want, save the image using the 'Save As' option.

Job Done!
After resizing. lets see the size of the image..

Its just 188KB....And the clarity/quality..?? Below is the re-sized image in its original size..!!

P.S : Please do remember that this tutorial does not apply as it is for all..!! It all depends on the Mega-pixel of the camera you use and the final quality you require after resizing. Use a trial and error method to suit individual needs. Here in the above example, actually the clarity of image is lost but its negligible for my final need of blog upload.
How did you like this article..?? Your comments /suggestions are most welcome.
If you have any tech questions in mind, do mail me. Will try to include in TT series.
Please share with your friends/fellow crafters/bloggers if you find the article useful.
Love,
Sridevi MuraliKrishna

Techie-Teusday
About Techie-Teusday:
TechieTeusday(TT) is basically intended to share the TECH knowledge which I acquired
while craft-blogging. Posts will be on photo-editing, blogging, blogger features, Gmail and more. As of now, Techie-Thursday posts will be out on every alternative teusday.
You can see all the Techie-Tuesday posts here.
Thank you so much..I usually do it in photoshop but now I learnt something new.. :)
ReplyDeleteand some-thing easy too :) happy that u liked it..!!
Deletehey thanks sridevi,back in action aa.congrats on your winning in ICR,good to know that you are back.
ReplyDeletehey thanks kavitha.. u r back too ;)
Delete